Breaking down Custom View Controller Animations with 'Moves'
I open sourced a view controller transition library called ‘Moves’, which makes custom transitions (modals, popups, tooltips) a whole lot easier to develop.
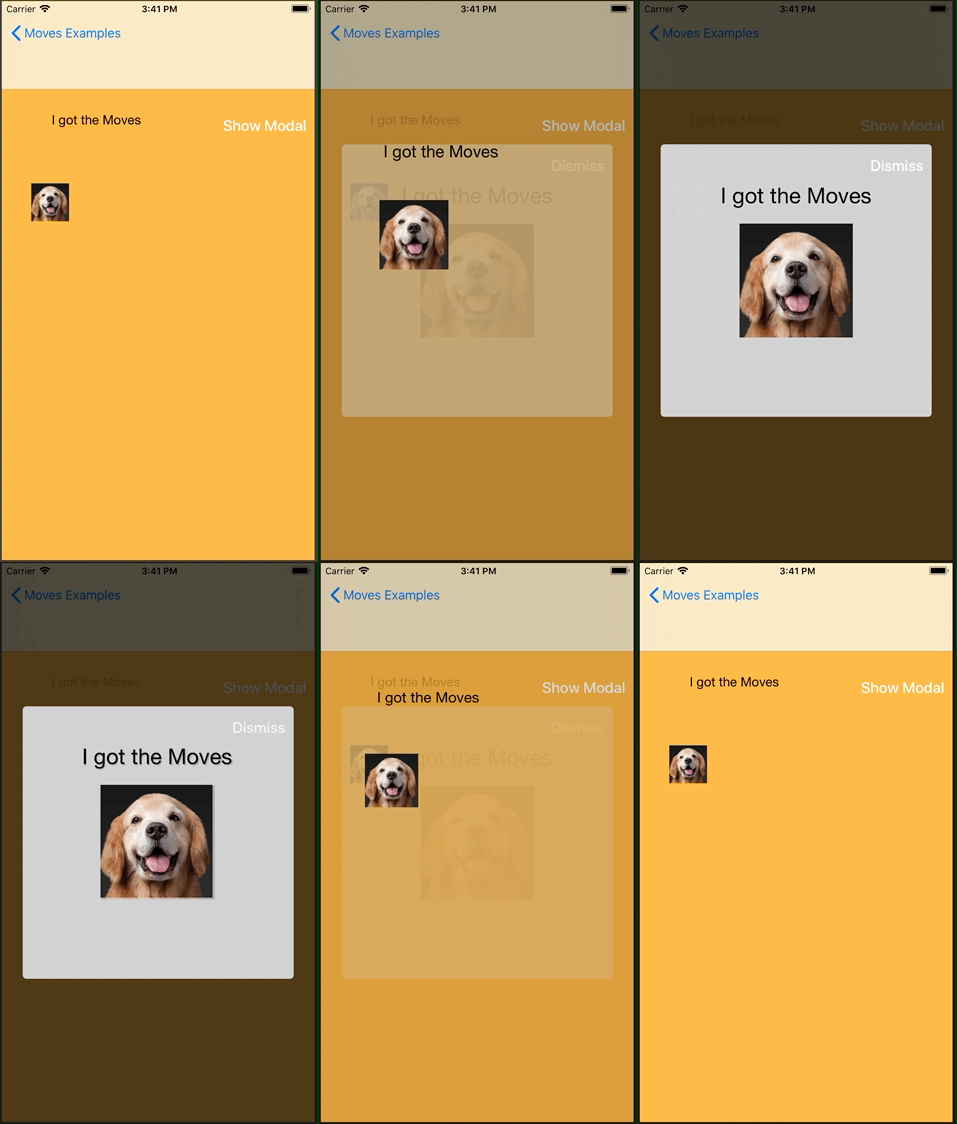
Table of Contents
When I first learned to program for iOS, I was always interested in how view controller animations worked. How did some apps have such cool animations when all I can is present a full sized modal over my current screen?
I love keeping up with what’s trending in swift on github because there’s always at least one cool project that inspires me and teaches me something. For about a quarter of those repos, I’ve noticed the library had to do with simplifying animations, specifically presenting a modal in a cool, flashy way. I’m not here to bash any of them; as a matter of fact, I’ve used and still use some of those libraries in iOS projects I work on today!
Introducing “Moves”
I open sourced a view controller transition library called ‘Moves’, which makes custom transitions (modals, popups, tooltips) a whole lot easier to develop. Unlike other libraries though, Moves is not as simple or close to a 1-line solution that other animation libraries have successfully pulled off. Rather, Moves is a pretty vanilla wrapper that champions the flexibility of your own view controller by leveraging generics and the standard UIViewControllerTransitioningDelegate APIs from UIKit.

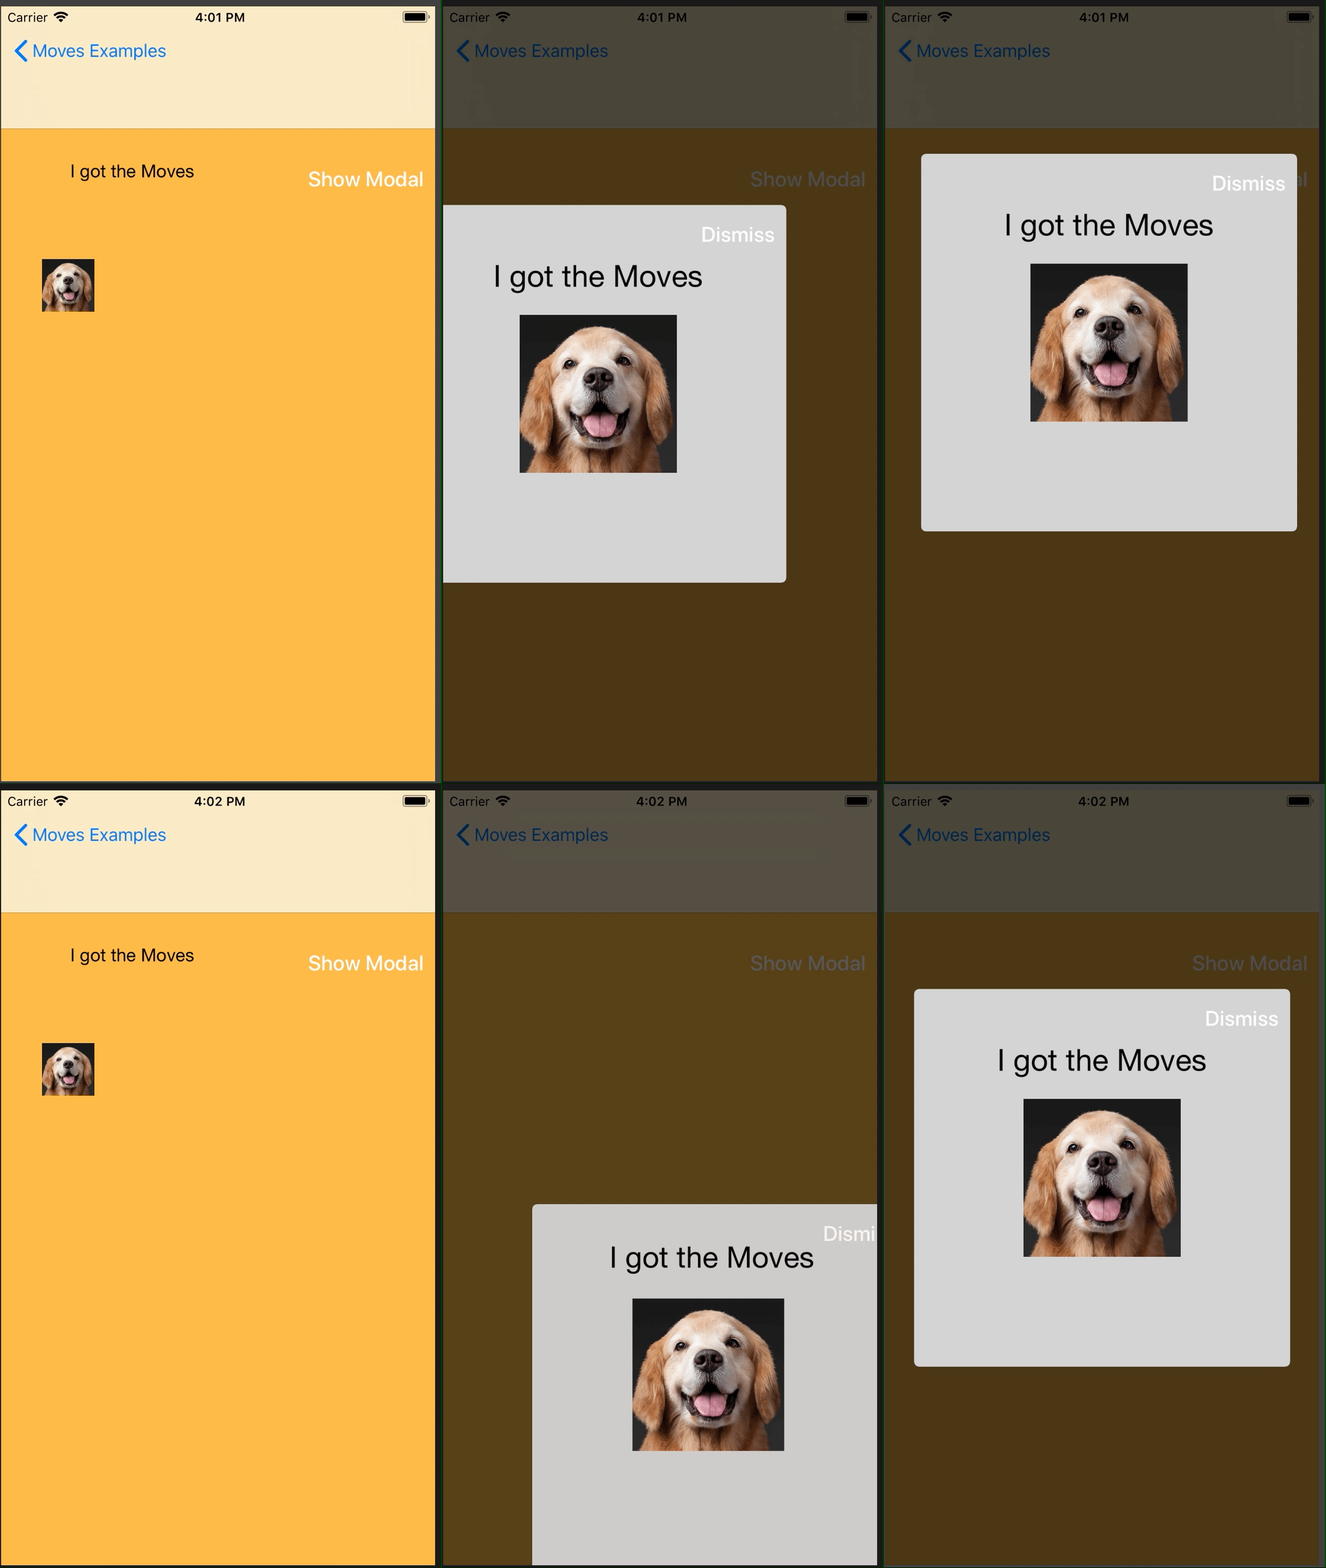
Example of a custom transition Moves can help you do
This post is about my learnings making this open sourced library. This wrapper is not perfect, and admittedly, there are a couple of points and lines of code which I don’t fully understand (more on that later), but nonetheless, I think this library is a great teaching point for students and people similar to myself who have imported animation libraries before without a good grasp of how the libraries work! Follow along with this instructional post or try out the library out yourself on cocoapods. If you open the source project, be sure to set the project scheme to ‘Moves-Tutorial’, which contains the final code sample of my walkthrough below.
1 | pod 'Moves' |
Understanding UIViewControllerTransitioningDelegate
The simplest way to create a custom view controller animation is conforming to the ‘UIViewControllerTransitioningDelegate’. This delegate is required to do one thing, and that is proposing how a starting view controller will animate to a destination view controller. This is illustrated most easily (and lazily) by having the initial view controller itself conform to the ‘UIViewControllerTransitioningDelegate’.
class MasterViewController: UIViewController, UIViewControllerTransitioningDelegate {

// MARK: UIViewControllerTransitioningDelegate
func animationController(forPresented presented: UIViewController, presenting: UIViewController, source: UIViewController) -> UIViewControllerAnimatedTransitioning? {
  return self
}

func animationController(forDismissed dismissed: UIViewController) -> UIViewControllerAnimatedTransitioning? {
  return self
}
Soon enough, the Swift compiler will yell at you with
Type ‘MasterViewController’ does not conform to protocol ‘UIViewControllerAnimatedTransitioning’.
Of course, there are some required methods that this view controller must fulfill if it wants to declare itself as the transitioning delegate! Respect UIViewControllerAnimatedTransitioning’s name by adding its two required protocol methods into MasterViewController. The first method is:
// MARK: UIViewControllerAnimatedTransitioning
func transitionDuration(
  using transitionContext: UIViewControllerContextTransitioning?
  ) -> TimeInterval {
  return 2
}

func animateTransition(
  using transitionContext: UIViewControllerContextTransitioning
  ) {
  // ** Add your custom animation logic here **
}
The first required method simply needs to know how long you expect your custom animation to last. I set it to 2 seconds so that it’ll be easy to distinguish a slow custom animation.
The latter method ‘animateTransition(using transitionContext:’ is where the heart of your transition logic is located. Simply put, this is where you declare how your initial view controller leaves the screen, alongside how your destination view controller enters the screen. Let’s see how a simple fade-in transition would look like in this function.
func animateTransition(
  using transitionContext: UIViewControllerContextTransitioning
) {

  // Guard check for the 'to' and 'from' view controllers.
  guard let fromVC = transitionContext.viewController(forKey: .from),
    let toVC = transitionContext.viewController(forKey: .to) else { return }

  // Start with destination vc hidden
  toVC.view.alpha = 0

  // Add toVC to container view of animation
  transitionContext.containerView.addSubview(toVC.view)
  toVC.view.frame = transitionContext.containerView.frame

  let totalDuration = self.transitionDuration(using: transitionContext)

  UIView.animate(withDuration: totalDuration, animations: {
    fromVC.view.alpha = 0
    toVC.view.alpha = 1
  }) { _ in
    transitionContext.completeTransition(true)
  }
}
There’s a ton to digest here, so let’s start with what ‘transitionContext’ is about.
transitionContext is provided to us from the UIKit system when we begin a custom transition. This context object has all the information you need to orchestrate your custom animation, specifically through the ‘to’ and ‘from’ view controllers that I optionally check for in the snippet above.
After I guard check for both view controllers, I proceed with a simple setup of ‘fromVC’ by adding it’s main view onto the transitionContext’s containerView. You can think of this container view as the stage in which this entire animation takes place.
In Apple’s documentation,
All animations must take place in the view specified by the containerView property of transitionContext. Add the view being presented .. to the container view’s hierarchy and set up any animations you want to make that view move into position.
Also note that because we are performing a fade animation, I set the initial view alpha to 0.
Lastly, I perform a simple animation ‘flip-floping’ the view alphas of toVC and fromVC, which should effectively create the fade in-fade out animation we want.
UIView.animate(
  withDuration: totalDuration,
  animations: {
    fromVC.view.alpha = 0
    toVC.view.alpha = 1
  }) { _ in
  // Call this to indicatate that transition is complete
  // System performs the removal of from view controller
  // subview
  transitionContext.completeTransition(true)
}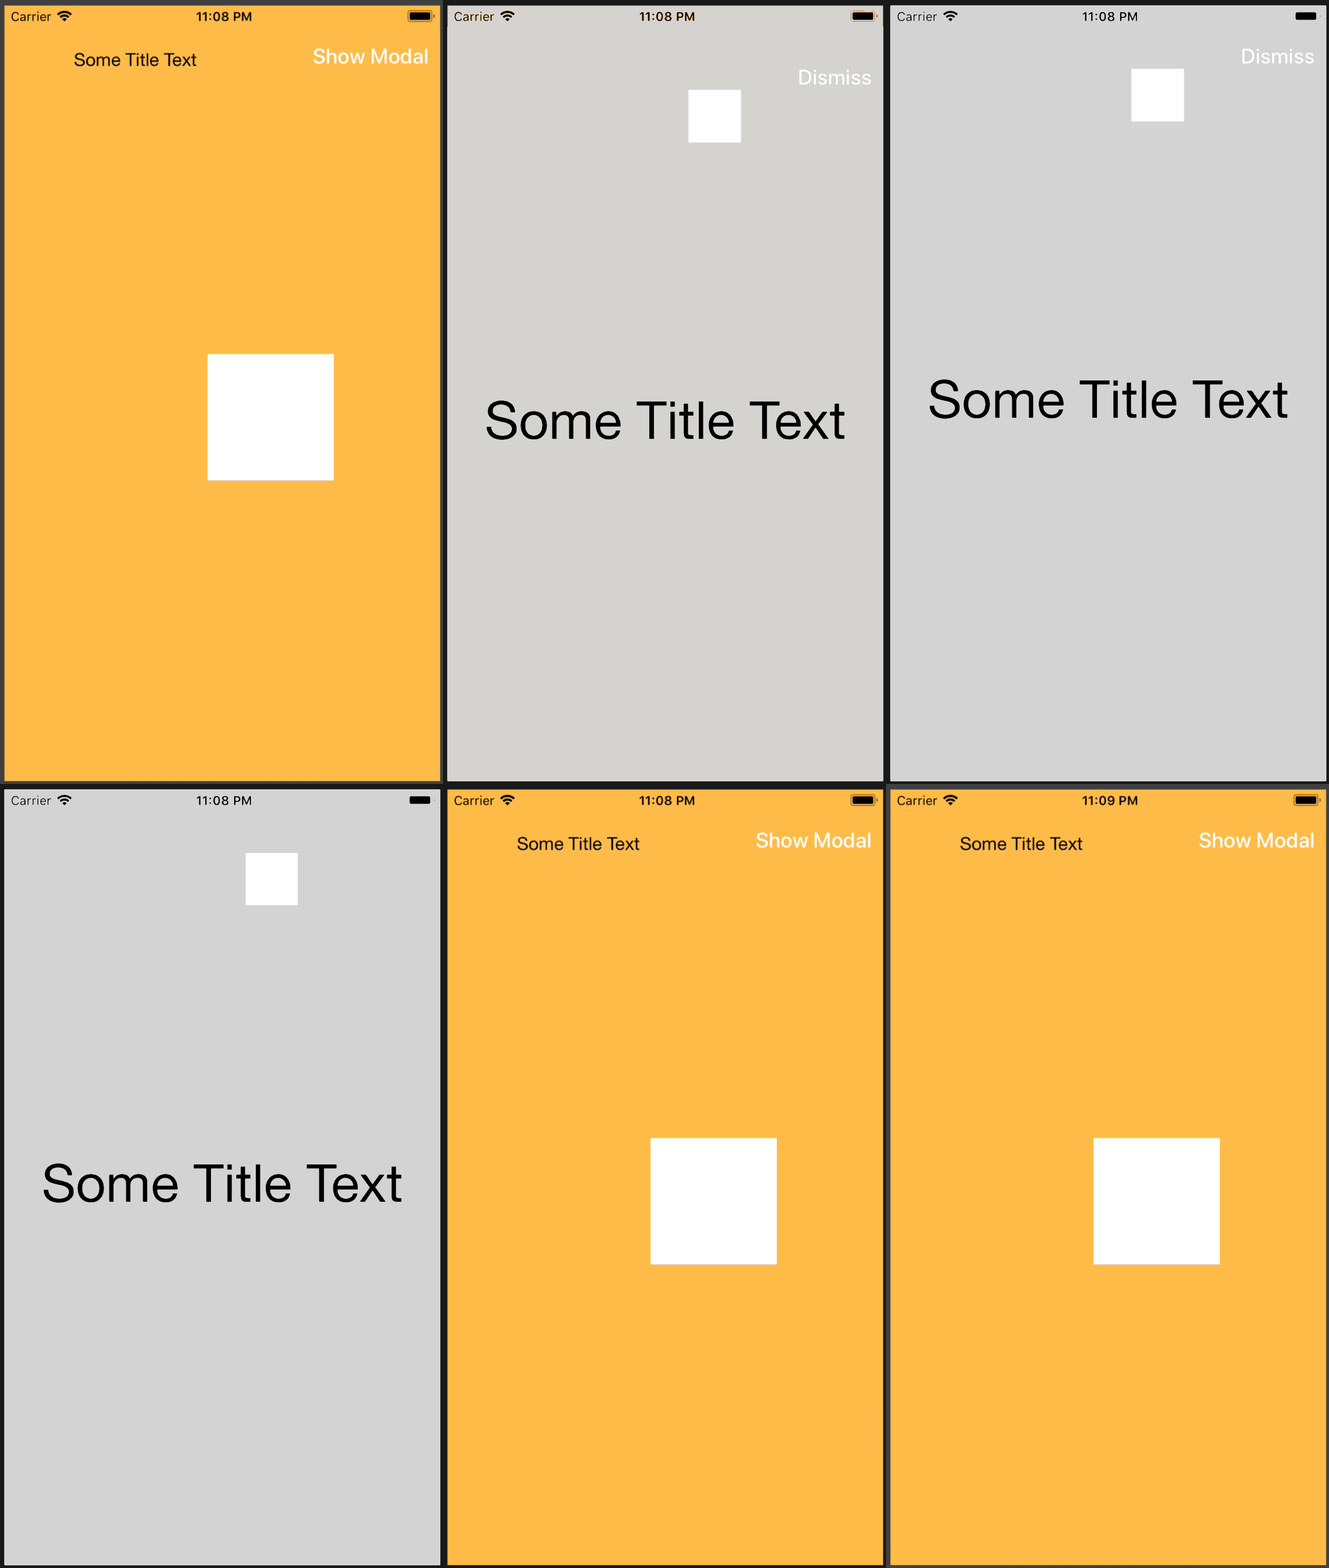
It doesn’t work
If you ran the application at this point, you will realize that something is still not right — when I tap the “show modal” button, I still get the default modal animation given by Apple where the destination view slides from the bottom up; where’s my fade!?
That’s because we’re still missing one key piece. We haven’t told the destination view controller’s transitioning delegate that we are managing it’s transition!
@IBAction func transitionButtonPressed(_ sender: Any) {

  let vc = storyboard!.instantiateViewController(withIdentifier: "ModalViewController") as! ModalViewController
  // We are managing the destination vc's animation on its behalf.
  // As a result, the system will call the 'transitionDuration:' and
  // 'animateTransition:transitionContext:' methods we declared above
  // when coordinating this custom transition.
  vc.transitioningDelegate = self

  present(vc, animated: true, completion: nil)
}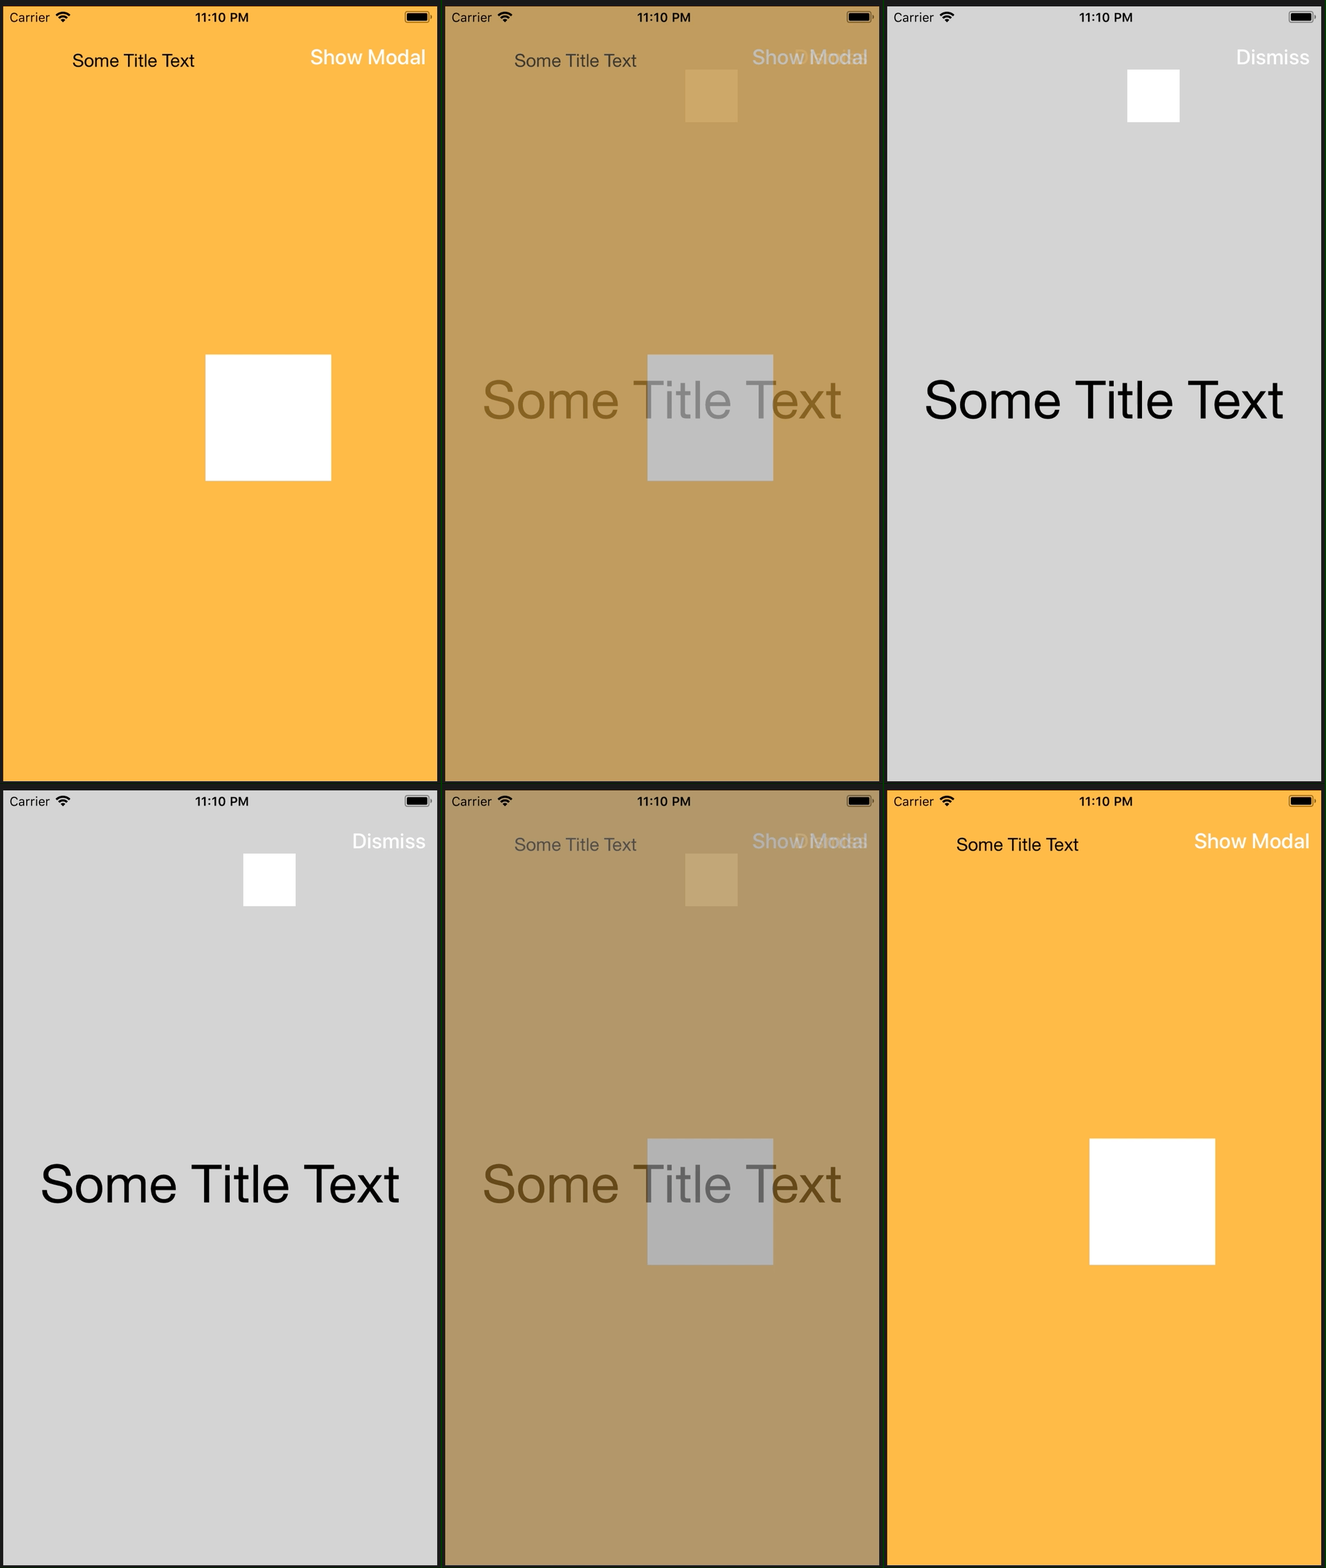
It works 👍
The best part about this animation is that our animateTransition: logic works for both the presentation and dismissal of this view controller.
If you did not realize, it wasn’t just our presenter that illustrated the fade animation— the modal dismisser created the fade transition too! This is because our view controller declared itself as both the presenter and dismisser animator in the UIViewControllerTransitioningDelegate methods in the very beginning. As a result, the system inquires from our delegate, MasterViewController, twice, calling the same ‘animateTransition’ fade logic each time we present and dismiss the modal.
That sounds very convenient, but if you’re thinking what I’m thinking, you might be wondering how we can further customize and separate out all our transition logic from our view controller.
Enter Moves
Moves does everything we’ve talked about above, but it abstracts away the tedious parts of process, such as conforming to a delegate method just to return a duration, and casting your to and from view controllers to the exact type you expect them to be with generics; in our case it’s MasterViewController and ModalViewController. This allows us to create transitions with all the resources specific to our view controller subclasses: fading out specific collection view cells, sliding out a navigation bar, etc.
open class MovesCoordinator<
  T: UIViewController,
  U: UIViewController
  >: NSObject, UIViewControllerTransitioningDelegate {

  public typealias VCAnimator = Animator<T, U>
  public let presenter: VCAnimator
  public var dismisser: VCAnimator

  // MARK: UIViewControllerTransitioningDelegate
  public func animationController(
    forPresented presented: UIViewController,
    presenting: UIViewController,
    source: UIViewController
    ) -> UIViewControllerAnimatedTransitioning? {
    return presenter
  }

  public func animationController(
    forDismissed dismissed: UIViewController
    ) -> UIViewControllerAnimatedTransitioning? {
    return dismisser
  }

}
Above all else, it abstracts our custom transition business logic outside the view controller in contrast to my examples above. Our presentation and dismissal logic are separated into their own Animator classes, and we will introduce the MovesCoordinator, which takes over as the UIViewControllerTransitioningDelegate, and primary manages our presenter and dismisser animators, as well as anything else in between such as background dimming and possible panning of our modal view controller. When creating a MovesCoordinator, you simply need two animators with the same pair of view controller types, each with any configurations specific to that Animator.
lazy var movesCoordinator: MovesCoordinator<UINavigationController, SlideUpWithContextModalViewController> = {


  let modalConfig = ModalConfiguration()
  modalConfig.width = self.view.bounds.width * 13/15
  modalConfig.height = self.view.bounds.width * 13/15
  modalConfig.roundedCorners = [.topLeft, .topRight, .bottomRight, .bottomLeft]
  modalConfig.roundedCornersRadius = 5

  let presenter = FadeInOverContextAnimator<UINavigationController, SlideUpWithContextModalViewController>(
    modalConfig: modalConfig,
    duration: 0.6
  )

  let dismisser = FadeOutOverContextAnimator<UINavigationController, SlideUpWithContextModalViewController>(duration: 0.6)


  let coordinator = MovesCoordinator(
    presenter: presenter,
    dismisser: dismisser
  )

  // Allow pan with a dismiss threshold of 100pts
  coordinator.movesConfig.pannable = true
  coordinator.panConfig.dismissRadiusThreshold = 100

  return coordinator
}()
When we need to present our SlideUpWithContextModalViewController view controller, we simply call MoveCoordinator’s present: method, which abstacts the tedious boilerplate of view controller transitiong delegate setting.
let vc = storyboard!.instantiateViewController(withIdentifier: "SlideUpWithContextModalViewController") as! SlideUpWithContextModalViewController
movesCoordinator.present(vc, presentingVC: self.navigationController!)
1 2 | let vc = storyboard!.instantiateViewController(withIdentifier: "SlideUpWithContextModalViewController") as! SlideUpWithContextModalViewControllermovesCoordinator.present(vc, presentingVC: self.navigationController!) |
Challenges
DIMMING
Adding a dim overlay is a very frequent capability when presenting a toast or modal/tooltip in iOS. I faced some challenges when deciding where to place the dim overlay logic. Firstly, we need to store a reference of the dim view somewhere because eventually, our dismisser transition logic will need to remove it from the view hierarchy. Naturally, we want to present our dim overlay at the same time our presentation transition gets triggered, so I considered placing the dim overlay logic in the presenting Animator class. But, the issue there is that our presenting Animator and dismissing Animator are two separate objects unbeknownst of each other’s existence. Animators do not even have a weak reference to their parent MovesCoordinator. Adding a dim overlay in one animator class would not work because it’s corresponding dismisser cannot access the stored dim overlay reference.
Instead, I utilize observables in the Animator class in which I emit any relevant events from Animator to any object that subscribes to the observable properties.
open class Animator<
  PresentingVC: UIViewController,
 PresentedVC: UIViewController
 >: NSObject, UIViewControllerAnimatedTransitioning {

  public let events: Observable<AnimaterLifecycleEvent?> = Observable(nil)

  ...

  open func performAnimations(using transitionContext: UIViewControllerContextTransitioning, from presentingVC: PresentingVC, to presentedVC: PresentedVC, completion: @escaping ()-> ()) {

    // Publish to any subscribers that view controller
    // transition for this animator will start.
    events.value = AnimaterLifecycleEvent.transitionWillAnimate(
      transitionContext: transitionContext
    )

    // Should be subclassed; define how the
    // transition should perform in subclass.
  }
}
If you are not familiar with observable subjects or ReactiveX(RxSwift, RxJava, etc), you can simply think of my current use case of an Observable as a property that notifies any subscribing object of its’ changes — sort of how NotificationCenter behaves, but observables are more strongly coupled to its subscribers. (You actually need to have access to the observable property, whereas with Notifications— all you need is a string to pick up on broadcasted data.)
What do observables have to do with creating a dim overlay? Well, because if our presenter and dismisser animators are capable of emitting when they start and finish their transition, we can initiate other events in tandem with our animator events, such as presenting and hiding a dim overlay!
private func observeAnimatorLifeCycles(
  presenter: VCAnimator,
  dismisser: VCAnimator
  ) {

  for animator in [presenter, dismisser] {

    animator.events.observe { [weak self] (_, newEvent) in

    guard let strongSelf = self else { return }
    guard let event = newEvent else { return }

    switch event {
    case .transitionWillAnimate(let transitionContext):
      if strongSelf.config.showBackgroundDimView {
        strongSelf.handleBackgroundDimView(
          isPresenting: animator.isPresenter,
          transitionContext: transitionContext
        )
    }
    default:
      break
    }
    }.disposed(by: disposeBag)
  }
}
In the example above, MovesCoordinator observes its animators’ tranitionWillAnimate event, which calls handleBackgroundDimView when tranitionWillAnimate: gets fired. (Depending on whether the animator is a presenter or dismisser, handleBackgroundDimView handles the insertion or removal of our dim view, respectively.)
Extras
CONTEXTUAL ANIMATIONS (EXPERIMENTAL)
I’ve always been fascinated with Duolingo’s segue transitions in it’s iOS application. If you’ve never heard of Duolingo, it’s a simple app that helps people learn new languages with fun modular lessons you can complete on-to-go.
I’ve always wanted to replicate it and recently, Ray Wenderlich’s Dev Con, ran an animation workshop on recreating this popular animation. That workshop, led by Caroline Begbie, was a huge inspiration to me adding this contextual animation element. (If you’re interested, check out the Ray Wenderlich 2017 Vault Bundle, which provides all the videos and assignments that a RWDevCon participant received at this past year’s conference.)
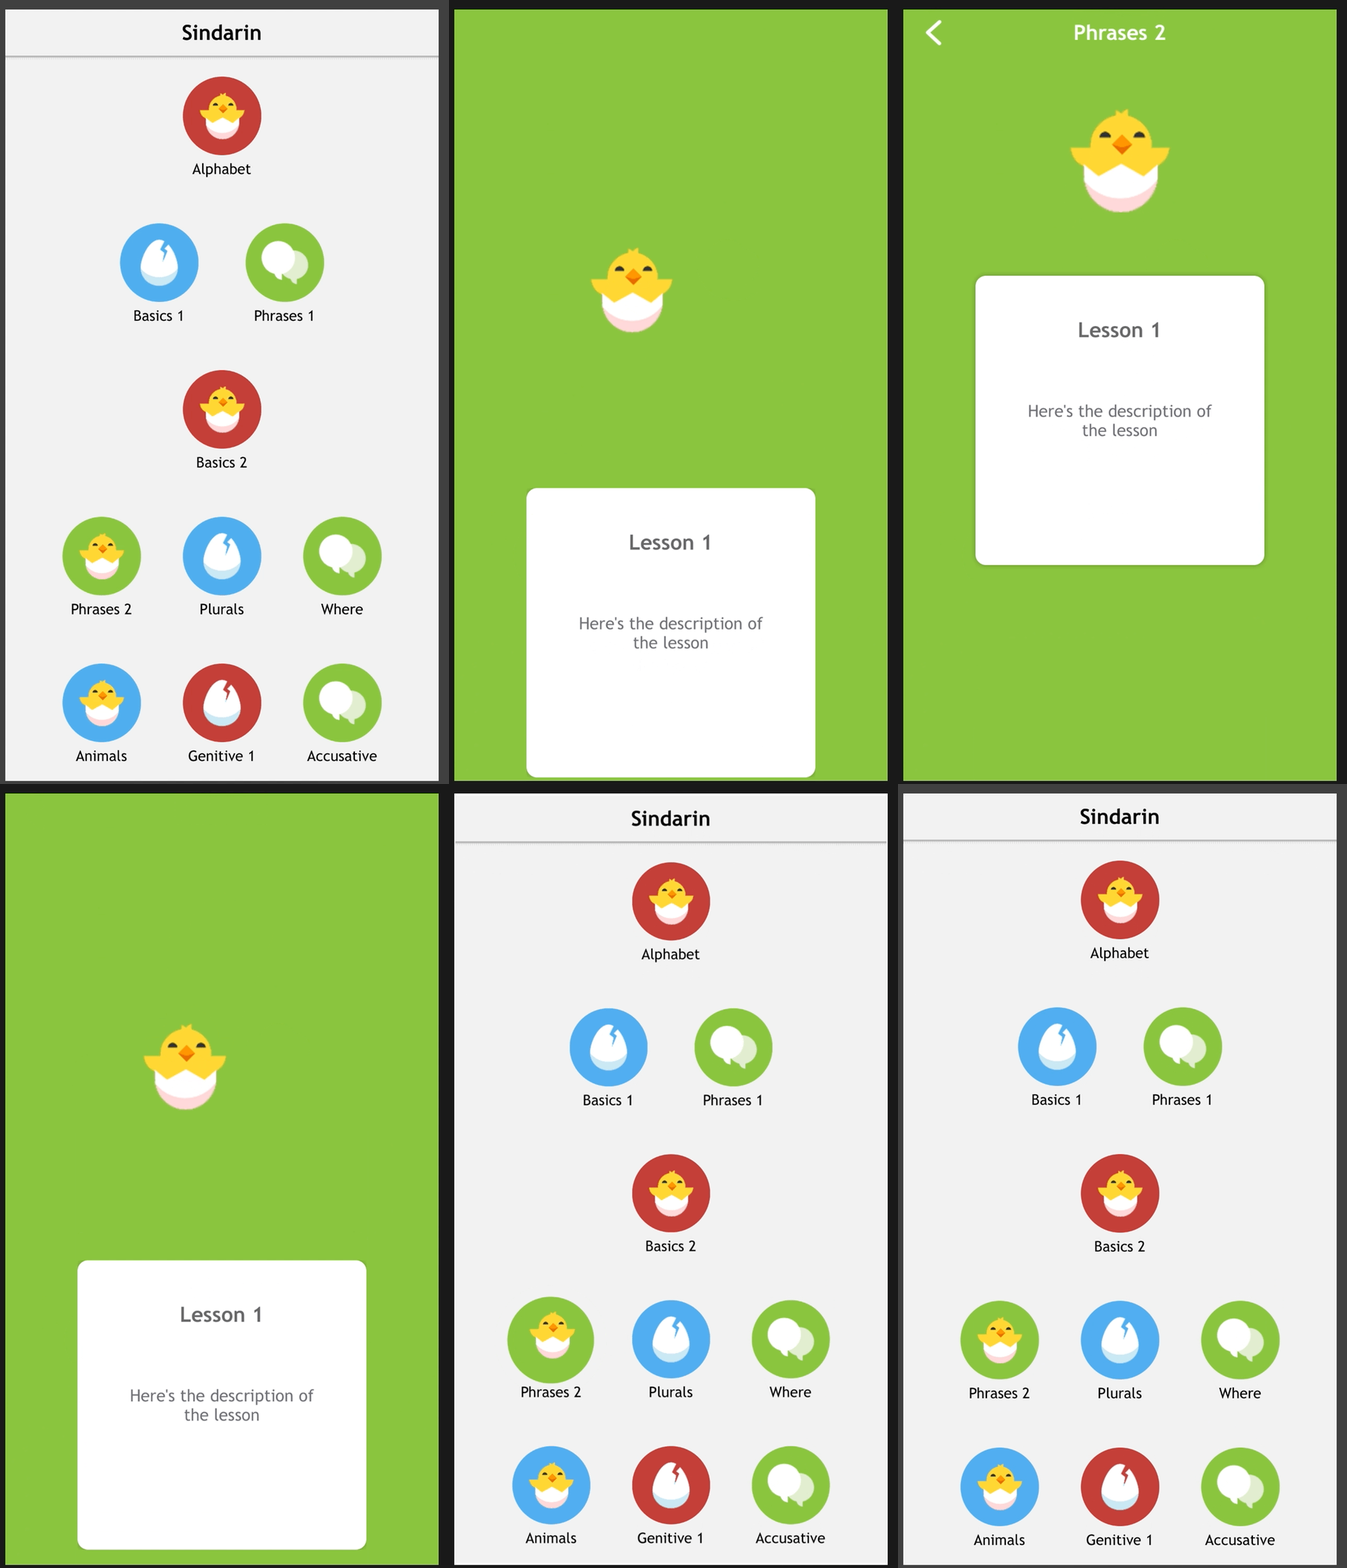
From here on I will refer to any pair of views that animates from one view controller to the next as “contextual views”.
Remember that MovesCoordinator declaration I wrote out above? where we called the coordinator’s present method? Let’s register some contextual views and see what happens.
let vc = storyboard!.instantiateViewController(withIdentifier: "SlideUpWithContextModalViewController") as! SlideUpWithContextModalViewController
movesCoordinator.present(vc, presentingVC: self.navigationController!)
movesCoordinator.present(vc, presentingVC: self.navigationController!, with: { [weak self] () -> ([ContextualViewPair]) in

  guard let strongSelf = self else { return [] }

  // Register contextual views
  return [
    ContextualViewPair(strongSelf.item, vc.detailItem),
    ContextualViewPair(strongSelf.titleTextLabel, vc.detailTitleTextLabel)
  ]
})
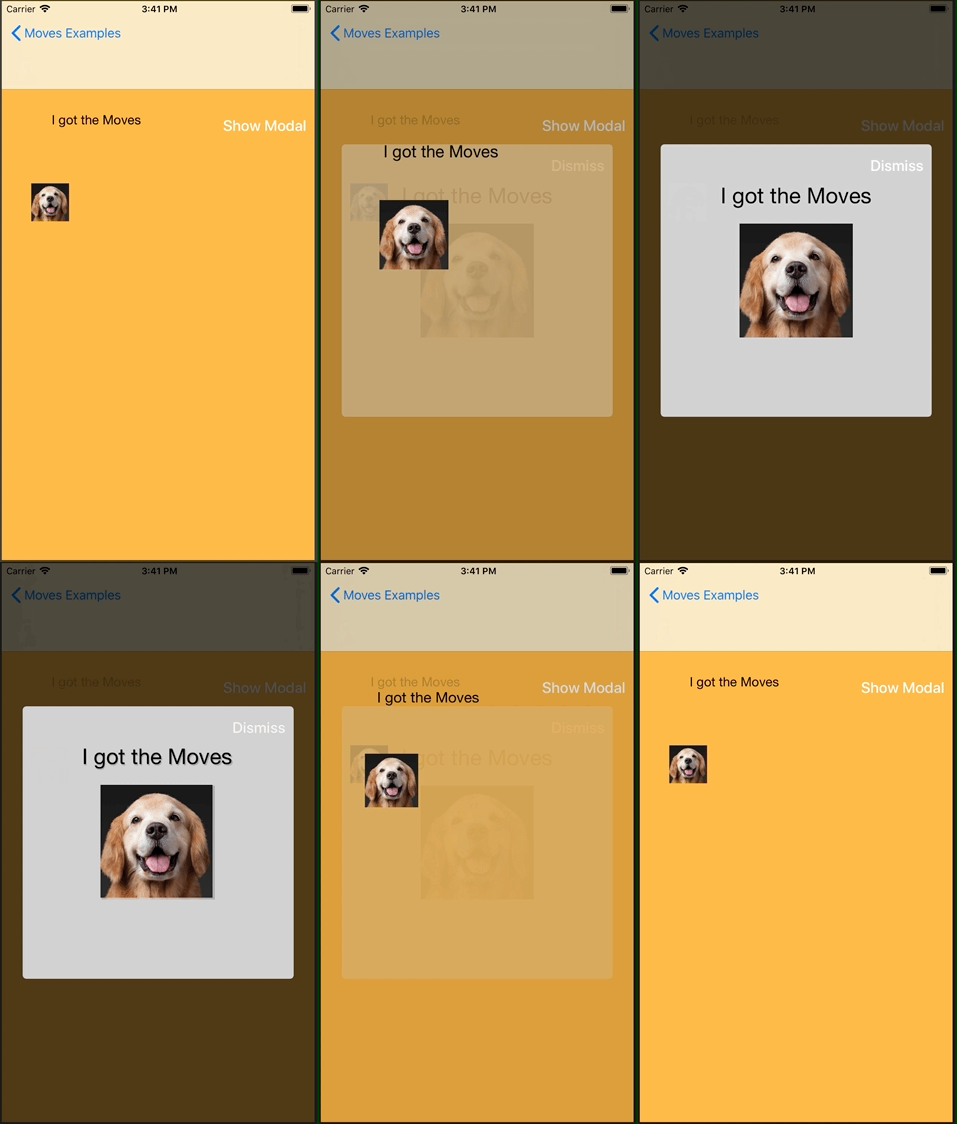
HOW DOES THIS ANIMATION WORK?
The centerpiece to this transition is snapshot views. The views owned by each view controller never move at all. I create a snapshot over the initial view, hide the real views, then animate the snapshot where the destination view belongs. Finally, I unhide the destination view and remove the snapshot above it off the superview.
That sounds complicated so I will just show you what I mean. For demonstration purposes, I do not fully hide the contextual views; instead they are at alpha 0.2 so you can see how this animation sequence plays out.
CHALLENGES I FACED
The two challenges I faced when attempting to abstract this feature were:
- Decoupling the contextual view pairs as much as possible.
If you happen to have purchased or attended the animation talk at RWDevCon, you’ll notice the example application was designed to animate just 1 pair of views. What if we want two or three contextual views animating on transition? I needed to have an easy way to register contextual view pairs, at a point where the MovesCoordinator knew the destination frames. I also did not want to force a ‘layoutIfNeeded’ because you might have interface builder logic in the viewDidLoad of your destination view controller, and prematurely triggering that will crash your application. - Handling deeply embedded context views (an imageView in a UITableViewCell, in which its tableView is in a container view).
In the Duolingo example above, the animated view is only one subview layer deep from its view controllers’ root view. Things get a lot more complicated when they are deeply nested in subviews. In order for this snapshot to animate properly, we need to calculate precisely the initial and final frames of our contextual views. Otherwise, you can imagine how this animation will look completely wrong if we miscalulate frames and attempt to flip-flop the alphas of our snapshot and actual view. This is the main reason why I’ve labeled this contextual feature as ‘experimental’, because I have not solved certain scenarios that lead to this snapshot frame miscalculation. If you’re interested in how I perform frame calculations up each contextual view’s view hierarchy, check out the private methodanimateContextualViews:in theAnimatorclass.
CONCLUSION
The main goals for this library was to promote reusability & flexibility, not brevity; with that said, thanks for reading until the end! With this set of abstractions, developers can create a ton of common and popular view controller transitions. This is a work in progress, but I’ve been using this library in production for one my personal apps, SuperFit. Take a look again!

Contextual view controller transition in SuperFit Fitness App
Reach out to me at leojkwan@gmail.com or submit an issue on the Moves repo if you find any bugs or have a suggestion about the library. All feedback is welcome!


